How to Make a Fun Cotton Candy Cake at Home
Do you remember spinning cotton candy at the fair as a kid? Now, you can make that sweet magic in your own kitchen. A cotton candy cake recipe turns those happy memories into a tasty treat.
Making a cotton candy cake is more than just baking. It’s about creating a joyful experience. This recipe will show you how to make a dessert that’s as beautiful as it is delicious. It’s perfect for birthdays or just to add some fun to your baking.
The key to a great cotton candy cake is finding the right balance of flavors and techniques. You’ll learn how to pick the best cotton candy flavor and how to swirl it perfectly. This way, you’ll make a dessert that everyone will love.
Are you ready to turn your kitchen into a sweet wonderland? With a few simple ingredients and some creativity, you can make a cotton candy cake that your family will love. Let’s start our journey into the world of cotton candy cake baking!
Table of Contents
Understanding Cotton Candy Cake Essentials
Starting your DIY cotton candy cake journey means getting ready and knowing what you need. It’s all about the special ingredients and tools that make this dessert unique.
Required Ingredients and Equipment
To make a cotton candy cake, you’ll need certain ingredients and tools. Here’s what you should get:
- 2 cups all-purpose flour
- 1 cup granulated sugar
- 1/2 cup unsalted butter (softened)
- 2 large eggs
- 2 teaspoons vanilla extract
Here are the essential tools:
- Stand mixer
- 6-8 inch cake pans
- Measuring cups and spoons
- Whisk
Best Food Coloring Options for Pastel Effects
Getting the right colors is key for a cotton candy look. Gel food coloring is best for soft, vibrant pastels.
| Color | Recommended Use | Intensity |
|---|---|---|
| Pink | Primary cotton candy color | Soft pastel |
| Blue | Secondary accent color | Light sky blue |
Choosing the Right Cotton Candy Flavoring
The flavor of your cotton candy cake is what makes it special. Here are some great options:
- Blue Raspberry extract
- Strawberry syrup
- Vanilla-based cotton candy flavoring
“The magic of a cotton candy cake is in the details of its flavor and presentation.”
By picking the right ingredients and knowing how to prepare your cake, you’ll make a dessert that’s both tasty and beautiful. It’s like bringing the carnival to your table.
Preparing Your Cotton Candy Cake Batter
Making a cotton candy cake is all about the batter. You want it to be light and fluffy. This will make your cake unforgettable.

- 1 cup unsalted butter, room temperature
- 3 cups granulated sugar
- 5 large eggs
- 4 cups cake flour
- 1 tablespoon baking powder
- 1 teaspoon baking soda
- 1¼ teaspoons kosher salt
- 1¾ cups milk
- 1½ teaspoons cotton candy flavoring
The key to a great cotton candy cake is in how you mix it. Start by creaming the butter and sugar until it’s light and fluffy. Pro tip: Use room temperature ingredients for the smoothest consistency!
Then, add egg whites one at a time, making sure each is fully mixed in. Next, add the vegetable oil and cotton candy flavoring, mixing until it’s smooth. In another bowl, whisk together the dry ingredients – cake flour, baking powder, baking soda, and salt.
“Baking is an art that requires precision and passion” – Unknown Pastry Chef
Now, add the dry ingredients and buttermilk to the wet ingredients, alternating between the two. Mix gently to avoid a tough cake. Once it’s smooth, split the batter into two bowls. Add pink and blue food coloring to make it look like cotton candy.
Your batter is now ready to make a cotton candy cake that will wow everyone!
Creating the Perfect Swirl Technique
To make your cotton candy cake a showstopper, you need to master batter swirling. The right swirl can turn a simple cake into a stunning decoration that grabs everyone’s eye.

Layering Colorful Batters for Maximum Impact
Start by making two different batters for your cotton candy cake:
- Pink pastel batter
- Blue pastel batter
- Sifted cake flour (2 1/2 cups)
- Baking powder (2 tsp)
Mastering the Marble Effect
Here’s how to achieve stunning swirls:
- Alternate spoonfuls of pink and blue batter in cake pans
- Use a toothpick to gently mix colors
- Avoid overmixing to keep colors separate
- Tap pan gently to remove air bubbles
Precise Baking Parameters
| Baking Detail | Specification |
|---|---|
| Oven Temperature | 350°F (175°C) |
| Baking Duration | 28-32 minutes |
| Cooling Time | 5 minutes in pan |
“The secret to a perfect cotton candy cake is in the subtle swirl, not the complete mix.” – Professional Baker’s Tip
Pro tip: Watch your cake closely during baking. The perfect cotton candy cake decoration starts with a perfectly baked foundation. Your cake is ready when it springs back to touch and a toothpick comes out clean.
Making Cotton Candy Buttercream
Creating the perfect cotton candy cake recipe needs a dreamy buttercream. This frosting captures the essence of everyone’s favorite carnival treat. Your cotton candy cake ideas will come to life with this luscious frosting.
To start your buttercream adventure, you’ll need a few key ingredients:
- Unsalted butter (room temperature)
- Powdered sugar
- Whole milk
- Cotton candy flavoring
- Pinch of salt
- Pastel food coloring (optional)
Pro tip: The secret to smooth buttercream is patience and technique. Start by beating room temperature butter until it becomes light and almost white – this typically takes about 7 minutes.
Gradually add powdered sugar on low speed to prevent a messy kitchen. Once incorporated, mix in whole milk, a pinch of salt, and your cotton candy flavoring. For a whimsical touch, divide the frosting and create pastel pink and blue variations that will make your cake pop!
“A great buttercream is the canvas that turns a simple cake into an extraordinary masterpiece.” – Pastry Chef Recommendation
Your cotton candy cake recipe is now ready to be transformed with this incredible buttercream. The light, fluffy texture combined with the nostalgic cotton candy flavor will transport your guests back to childhood carnival memories.
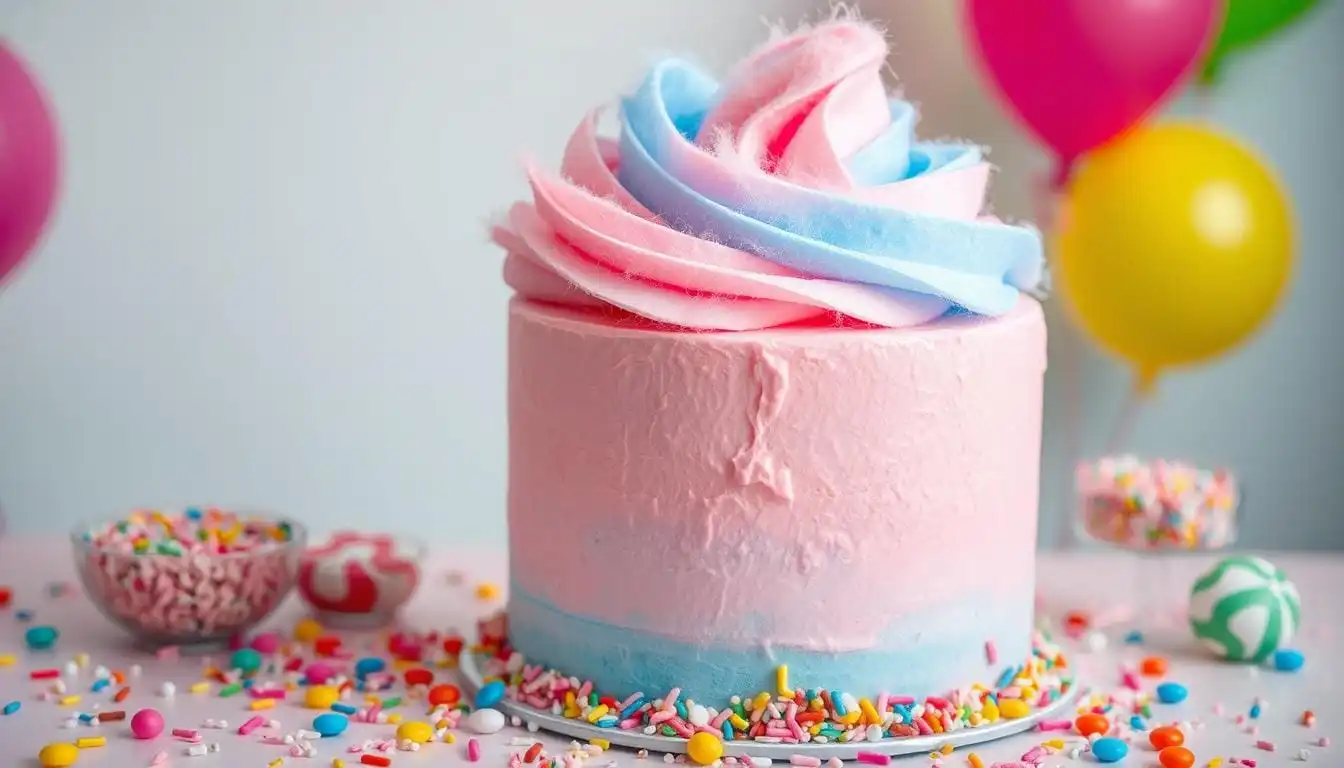
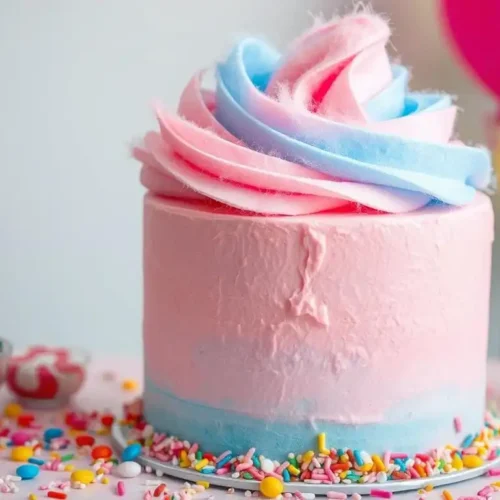
Decorating Your Cotton Candy Cake
Turn your cotton candy cake into a stunning masterpiece with creative decorating. This is where your cake comes to life, becoming a special centerpiece. It’s all about capturing the whimsical spirit of this sweet treat.
Watercolor Frosting Technique
Make your cotton candy cake look like a dream with the watercolor frosting technique. First, apply a thin layer of buttercream and chill the cake. Then, use pastel colors to add magic:
- Randomly apply dollops of pink, blue, and white buttercream
- Use an offset spatula to gently blend colors
- Smooth the surface for a soft, ethereal effect
Piping Border Designs
Add elegance to your cotton candy cake with beautiful border designs. Use a Wilton 4B tip to create swirled borders that look like cotton candy:
- Pipe swirls around the top and bottom cake edges
- Alternate between pastel colors for added depth
- Practice consistent pressure for uniform swirls
Adding Cotton Candy Topping
The cotton candy topping is the final touch that makes your cake stand out. Timing is key:
- Add fresh cotton candy just before serving
- Place cotton candy strategically on top of the cake
- Warn guests to enjoy quickly, as cotton candy dissolves within an hour
“A beautifully decorated cake is a work of art that delights both the eyes and the taste buds.”
Your cotton candy cake decorations will turn a simple dessert into a joyous experience. It’s a moment that sparks wonder and happiness.
Conclusion
Learning the best cotton candy cake recipe is more than baking. It’s about creating a magical experience. Your DIY cotton candy cake is a journey into culinary creativity. It mixes nostalgic flavors with stunning visuals.
Each slice of your cake tells a story of childhood wonder and baking skill. By following the techniques you’ve learned, you can turn simple ingredients into an extraordinary dessert. The secret is precision in measurement, careful color selection, and strategic decoration.
Your cake becomes a canvas where pastel colors, soft textures, and playful cotton candy elements come together. This creates something truly remarkable.
Remember, practice makes perfect with this DIY cotton candy cake. Don’t worry if your first attempt isn’t perfect. Each baking experience builds your skills and confidence. Try different flavor extracts, explore unique decoration techniques, and most importantly, have fun.
Whether it’s for a birthday or just for fun, your cotton candy cake will be unforgettable. Enjoy the joy of baking and let your imagination lead you on this delicious journey.
FAQ
How long does a cotton candy cake stay fresh?
Can I make the cotton candy cake in advance?
What if I can’t find cotton candy flavoring?
How do I prevent my cake from becoming too dense?
Can I make this cake gluten-free?
How do I achieve the perfect pastel colors?
Can I make this cake without a stand mixer?
How to Make a Fun Cotton Candy Cake at Home
Equipment
- Stand mixer or hand mixer
- 6-8 inch cake pans (2-3 recommended)
- Measuring cups and spoons
- Whisk
- Offset spatula
- Toothpicks for swirling
- Piping bags with decorative tips
Ingredients
For the Cake:
- 2 cups all-purpose flour
- 1 cup granulated sugar
- ½ cup unsalted butter softened
- 2 large eggs room temperature
- 2 teaspoons vanilla extract
- 1 tablespoon baking powder
- 1 teaspoon baking soda
- 1 ¼ teaspoons kosher salt
- 1 ¾ cups milk
- 1 ½ teaspoons cotton candy flavoring
- Gel food coloring pink and blue
For the Buttercream:
- 1 cup unsalted butter room temperature
- 4 cups powdered sugar
- 2-4 tablespoons whole milk
- 1 teaspoon cotton candy flavoring
- Pinch of salt
- Gel food coloring pink and blue, optional
For Decoration:
- Edible glitter
- Cotton candy topping add just before serving
Instructions
Step 1: Prepare the Cake Batter
- Preheat the oven to 350°F (175°C). Grease and line the cake pans with parchment paper.
- In a large bowl, cream butter and sugar until light and fluffy.
- Add the eggs one at a time, mixing well after each addition.
- Stir in the vanilla and cotton candy flavoring.
- In a separate bowl, sift together the flour, baking powder, baking soda, and salt.
- Gradually add the dry ingredients and milk to the wet mixture, alternating between the two. Mix until just combined.
- Divide the batter into two bowls. Add pink food coloring to one and blue to the other.
Step 2: Create the Swirl Effect
- Alternate spoonfuls of pink and blue batter in the cake pans.
- Use a toothpick to gently swirl the colors. Avoid overmixing to maintain distinct colors.
- Tap the pans gently to remove air bubbles.
Step 3: Bake and Cool
- Bake for 28-32 minutes or until a toothpick inserted into the center comes out clean.
- Let the cakes cool in the pans for 5 minutes before transferring them to a wire rack to cool completely.
Step 4: Make the Cotton Candy Buttercream
- Beat the butter on medium speed until creamy and fluffy (about 5-7 minutes).
- Gradually add powdered sugar, mixing on low speed.
- Add milk, cotton candy flavoring, and a pinch of salt.
- Divide the frosting and add pink and blue food coloring if desired.
Step 5: Assemble and Frost the Cake
- Level the cake layers if needed.
- Spread a layer of frosting between the cake layers.
- Apply a crumb coat and refrigerate for 30 minutes.
- Frost the entire cake and smooth it with an offset spatula.
Step 6: Decorate the Cake
- Use piping bags to add decorative swirls along the edges.
- Apply edible glitter for a magical touch.
- Add fresh cotton candy just before serving for the final whimsical element.
Notes
Pro Tips:
- Always use room-temperature ingredients for the smoothest batter.
- Use gel food coloring for vibrant pastel shades.
- Add cotton candy topping just before serving to prevent it from dissolving.
Did You Try Our Recipe?
There are no reviews yet. Be the first one to write one.