Easy Banana Split Cake: A Fun Twist on a Classic Dessert
Summer in my family meant one thing: epic ice cream sundaes. We’d share them around our worn kitchen table. Those moments sparked my love for desserts that bring people together.
The banana split cake turns those memories into a delightful treat. It captures childhood joy in every slice. It’s perfect for gatherings, potlucks, or family celebrations.
This cake reimagines the classic banana split in a stunning layered dessert. It has layers of graham cracker crust, creamy filling, fresh fruits, and decadent toppings. It’s more than just a cake – it’s an experience that sparks conversation and creates lasting memories.
Whether you’re a baking novice or a seasoned dessert creator, this recipe promises to delight. You’ll learn how to craft a crowd-pleasing dessert that serves up to 20 people. It’s ideal for large gatherings. Get ready to transform simple ingredients into a showstopping banana split cake that will have everyone asking for seconds.
Table of Contents
What Makes Banana Split Cake Special
Imagine turning the classic banana split into a sundae cake. This treat captures the essence of a beloved frozen dessert. It’s perfect for gatherings and special occasions.
The banana split cake is more than a dessert. It’s a culinary experience with multiple layers of flavors and textures. It’s great for both casual dinners and elegant celebrations.
Classic Sundae Flavors in Cake Form
This dessert reimagines the banana split in a creative way. It includes key elements of the classic treat:
- Graham cracker crust like a sundae’s foundation
- Cream cheese filling that feels like ice cream
- Fresh fruit layers that capture the banana split’s essence
- Decadent toppings that enhance the sundae experience
Perfect for Special Occasions and Gatherings
Your no bake banana split cake will be the star of any event. Its impressive presentation and flavors are loved by all. It serves 12-16 people, perfect for parties and family gatherings.
| Serving Details | Specifications |
|---|---|
| Serving Size | 12-16 people |
| Preparation Time | 20 minutes |
| Chill Time | 2-4 hours |
No-Bake Option Available
For hot summer days, this sundae cake is a no-bake delight. Chill it for 2-4 hours, and enjoy a refreshing dessert with little effort.
“A slice of banana split cake is like summer on a plate – cool, sweet, and absolutely irresistible!”
Essential Ingredients for Your Banana Split Cake
To make the perfect banana split cake, you need the right ingredients. These ingredients bring the classic ice cream sundae to life. Your recipe for banana split cake turns ice cream toppings into a sweet treat.
- Graham Cracker Base: 2 cups of crushed graham crackers give a crunchy base
- 1/2 cup melted salted butter holds the crust together
- 8 oz cream cheese adds a creamy layer
- 4 medium bananas (about 2 1/2 cups when sliced)
- 20 oz crushed pineapple
- 1 cup sliced strawberries
- 2 1/2 cups powdered sugar
Ice cream toppings are key for the real flavor. You might want to add:
- 1/2 cup chopped toasted pecans
- 1/3 cup hot fudge topping
- 10 oz jar of maraschino cherries
- Rainbow candy sprinkles
“The secret to an amazing banana split cake lies in using fresh, high-quality ingredients that complement each other.” – Pastry Chef Recommendation
If you’re gluten-free, you can use gluten-free graham crackers. This banana split cake recipe is flexible. You can make it your own while keeping its classic appeal.
Kitchen Tools and Equipment Needed
To make the perfect banana split cake, you need some key kitchen tools. Having the right equipment makes preparing this treat much simpler.
Baking Essentials
Before you start baking, gather these important tools:
- 9×13-inch baking dish
- Electric mixer (stand or hand mixer)
- Measuring cups and spoons
- Mixing bowls in various sizes
- Rubber spatula
- Whisk
Decorating Tools
To make your banana split cake look amazing, get these decorating supplies:
- Piping bags
- Offset spatula
- Decorative cake server
- Cake turntable (optional but helpful)
- Cake decorating tips
Storage Containers
Storing your cake right keeps it fresh and tasty:
| Container Type | Best For | Storage Duration |
|---|---|---|
| Airtight cake carrier | Refrigerator storage | Up to 4 days |
| Freezer-safe container | Long-term preservation | Up to 1 month |
| Clear plastic cups | Individual servings | 2-3 days |
Pro tip: Always ensure your tools are clean and dry before starting your banana split cake preparation!
Step-by-Step Preparation Guide
Making the perfect banana split cake is simpler than you think! It’s a fun dessert that mixes classic tastes with easy steps. It’s sure to impress your family and guests.
- Graham Cracker Crust Preparation
- Crush 2 cups of graham crackers finely
- Mix with 1/2 cup melted butter
- Press mixture into a 9×13 inch pan
- Cream Cheese Layer Creation
- Soften 8 oz cream cheese at room temperature
- Blend with 2 cups powdered sugar
- Add 1 teaspoon vanilla extract
- Spread evenly over graham cracker base
- Fruit Layer Assembly
- Slice 4 ripe bananas
- Drain 20 oz crushed pineapple
- Arrange fruit layers carefully
“The secret to an amazing banana split cake is in the layers and precision!” – Pastry Chef Recommendation
Pro Tips for Success:
• Chill the cake for at least 2 hours before serving
• Use fresh, ripe bananas for best flavor
• Drain pineapple thoroughly to prevent soggy layers
Your banana split cake will be ready in about 30 minutes of prep. It needs 2-4 hours to chill. This no-bake dessert serves 12 and offers a fun twist on traditional cakes!
Creating the Perfect Layered Effect
Making a stunning layered cake is all about precision and creativity. This is true, even when you’re making a banana split cake. The art of layering turns a simple dessert into a feast for the eyes and taste buds.
Your success with a layered cake comes down to three key things: the foundation, the filling, and the decoration. Let’s dive into each to make sure your banana split cake is as amazing as it tastes.
Graham Cracker Crust Technique
A solid graham cracker crust is the foundation of your layered cake. Here are some tips to get it right:
- Use fresh graham cracker crumbs for the best crunch
- Mix crumbs with melted butter and sugar
- Press the mixture firmly into the pan
- Chill the crust for at least 20 minutes before adding layers
Cream Cheese Layer Tips
The cream cheese layer adds a tangy richness to your banana split cake. Here’s how to spread it smoothly:
- Soften cream cheese at room temperature
- Beat until light and fluffy
- Spread gently to avoid disturbing the graham cracker base
- Use an offset spatula for precise application
Fruit Arrangement Strategies
How you arrange the fruit makes a big difference. Here are some tips:
- Slice bananas lengthwise for elegant presentation
- Toss banana slices in lemon juice to prevent browning
- Arrange fruit in visually appealing patterns
- Create color contrast with different fruit selections
A great banana split cake is all about balanced layers, vibrant colors, and irresistible flavors. It’s a story told with every slice.
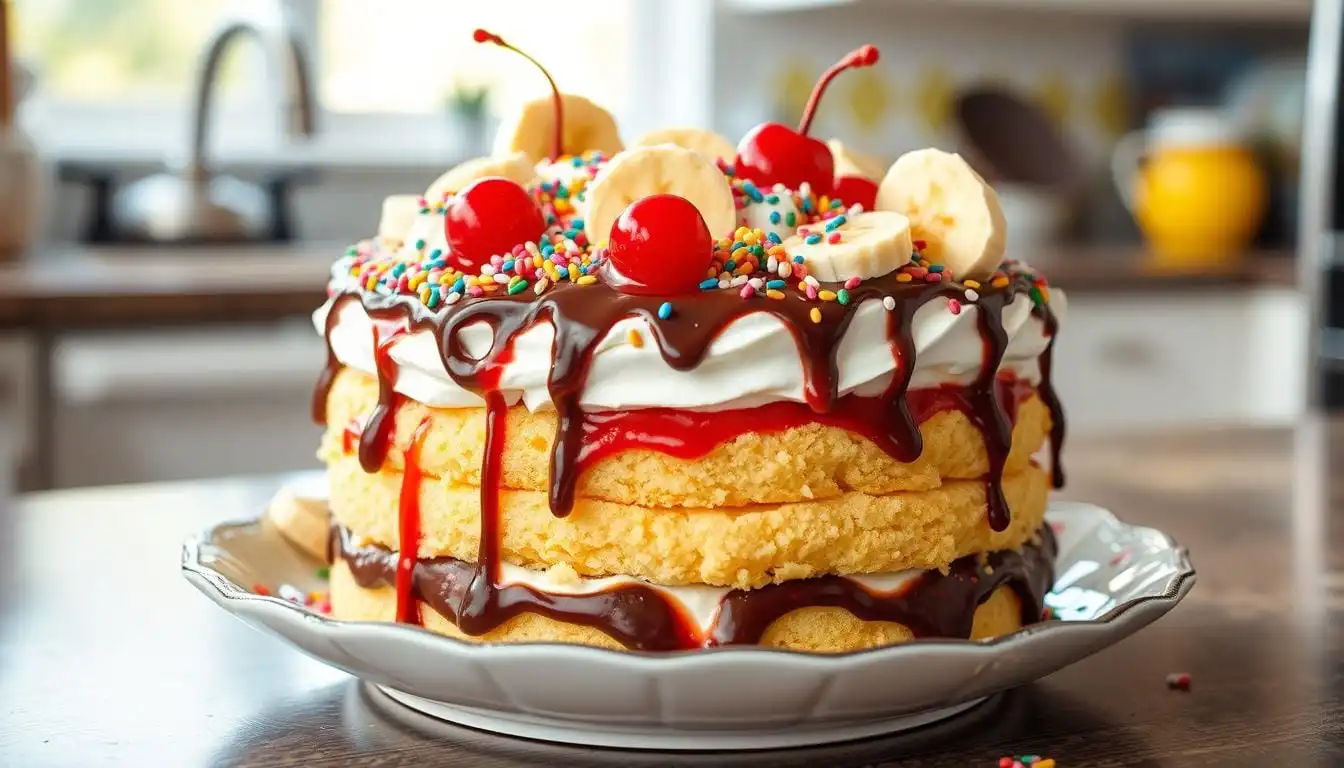
Decorating Your Banana Split Cake
Turn your banana split cake into a stunning dessert that looks as good as it tastes! Ice cream toppings are key to making it visually appealing. They will impress your guests.

- Chocolate Drizzle Technique
- Whipped Cream Piping
- Strategic Fruit Placement
- Nut and Cherry Garnishes
Here are some expert tips for decorating your banana split cake:
- Start with a smooth base of stabilized whipped cream
- Create chocolate drizzle patterns using a squeeze bottle
- Pipe decorative whipped cream rosettes around the edges
“A beautifully decorated dessert is eaten with the eyes first!” – Pastry Chef Wisdom
| Topping | Quantity | Decorative Impact |
|---|---|---|
| Maraschino Cherries | 12 pieces | Classic finishing touch |
| Chopped Peanuts | ⅓ cup | Adds crunchy texture |
| Strawberry Sundae Topping | ⅓ cup | Vibrant color accent |
| Chocolate Drizzle | As desired | Rich visual appeal |
Pro tip: Chill your cake for 30-45 minutes between decorating layers. This ensures each element sets perfectly. Your banana split cake will not only taste amazing but look like a pro made it!
Storage Tips and Make-Ahead Options
Making the perfect frozen dessert for summer treats needs smart storage tips. Your banana split cake needs careful handling to keep its layers and taste fresh.
Refrigeration Guidelines
After making your dessert, it’s important to refrigerate it right. This keeps its flavor and texture great. Here are some key storage tips:
- Chill the cake for at least 4 hours before serving
- Keep in an airtight container to maintain moisture
- Keep refrigerated at 40°F or below
- Consume within 4 days for optimal taste
Freezing Instructions
Freezing is a great way to keep your dessert longer. Here’s how to do it:
- Wrap the cake tightly in plastic wrap
- Place in a freezer-safe container
- Freeze for up to 3 months
- Thaw in the refrigerator overnight before serving
Serving Recommendations
For the best experience with your dessert, follow these serving tips:
- Remove from refrigerator 15-20 minutes before serving
- For clean slices, use a sharp knife warmed in hot water
- Garnish with fresh toppings just before serving
- Serve on chilled plates for maximum enjoyment
Pro tip: For the most impressive presentation, let your banana split cake sit at room temperature for a few minutes to soften slightly before slicing.
By following these storage and serving guidelines, your banana split cake will be a hit at any summer event.
Creative Variations and Substitutions
Your banana cake journey doesn’t end with the classic recipe. It’s time to explore new ways to make your banana split cake your own. By trying different ingredients and methods, you can create many tasty variations.

Here are some cool ways to change up your banana cake and ice cream cake:
- Fruit Substitutions
- Swap bananas for strawberries
- Try mixed berries for a pop of color
- Add tropical fruits like mango or pineapple
- Crust Alternatives
- Use chocolate graham crackers
- Go for Oreo cookie crumbs
- Try a gluten-free pretzel crust
- Flavor Enhancements
- Add a caramel drizzle
- Swirl in Nutella
- Top with toasted coconut
When making changes to your banana split cake, think about dietary needs. For those who can’t have gluten, use gluten-free graham crackers. If you’re dairy-free, try coconut whipped cream or plant-based cream cheese.
“Creativity is the secret ingredient in transforming a classic dessert into your signature treat!” – Culinary Experts
Here are some amazing ice cream cake ideas to take your banana split cake to the next level:
| Variation Type | Key Ingredients | Unique Twist |
|---|---|---|
| Tropical Fusion | Coconut ice cream, pineapple | Rum-soaked fruit garnish |
| Chocolate Lover’s | Chocolate graham crust, chocolate chips | Dark chocolate ganache drizzle |
| Nutty Delight | Pecans, caramel | Praline crunch topping |
The magic of banana split cake is in its ability to adapt. Feel free to try new things and make your own special dessert!
Conclusion
Your banana split cake adventure is just starting. This party dessert turns a classic sundae into a stunning layered treat. It will wow friends and family at any event.
The banana split cake is easy and flexible. You can make it with simple ingredients and little prep time. It looks and tastes like it’s from a pro bakery. It’s perfect for summer barbecues, birthdays, or family dinners.
Practice makes perfect with this cake. Each time, you’ll get better and find new ways to make it your own. Feel free to try different fruits, toppings, or special diets. The key is to enjoy making and sharing it with loved ones.
So, get your ingredients ready and show off your pastry skills. Your banana split cake journey is about to begin!
FAQ
What exactly is a banana split cake?
Is this a baked or no-bake dessert?
How long does a banana split cake last in the refrigerator?
Can I make this cake ahead of time?
Are there any gluten-free or dairy-free variations?
How many people does a banana split cake typically serve?
What are some creative topping variations?
Can I freeze a banana split cake?
What’s the best way to slice this cake?
Are there any tips for preventing bananas from browning?

Banana Split Cake
Ingredients
Graham Cracker Crust:
- 2 cups crushed graham crackers
- ½ cup melted salted butter
Cream Cheese Layer:
- 8 oz cream cheese softened
- 2 ½ cups powdered sugar
- 1 tsp vanilla extract
Fruit Layer:
- 4 medium bananas about 2 1/2 cups when sliced
- 20 oz crushed pineapple drained
- 1 cup sliced strawberries
Toppings (optional but recommended):
- ½ cup chopped toasted pecans
- ⅓ cup hot fudge topping
- 10 oz jar of maraschino cherries
- Rainbow candy sprinkles
Instructions
Graham Cracker Crust Preparation:
- Crush 2 cups of graham crackers into fine crumbs using a food processor or a plastic bag and rolling pin.
- In a bowl, mix the crushed graham crackers with 1/2 cup melted salted butter.
- Press the mixture evenly into the bottom of a 9×13-inch baking dish to form a firm crust.
- Chill the crust in the refrigerator for at least 20 minutes to set.
Cream Cheese Layer Creation:
- Soften 8 oz of cream cheese at room temperature for easier blending.
- Beat the cream cheese with 2 1/2 cups powdered sugar and 1 tsp vanilla extract until smooth and fluffy.
- Spread the cream cheese mixture evenly over the chilled graham cracker crust using an offset spatula.
Fruit Layer Assembly:
- Slice 4 medium bananas (about 2 1/2 cups) and layer them over the cream cheese mixture.
- Drain the 20 oz can of crushed pineapple well to avoid excess moisture, and spread it over the banana layer.
- Add 1 cup of sliced strawberries on top, arranging the fruit evenly for a colorful presentation.
Topping the Cake:
- Sprinkle 1/2 cup chopped toasted pecans evenly over the fruit layers.
- Drizzle 1/3 cup hot fudge topping over the cake, covering the top with a luscious chocolate layer.
- Add 10 oz of maraschino cherries (or more, depending on preference) for a classic touch.
- Sprinkle with rainbow candy sprinkles for a fun pop of color.
Chilling the Cake:
- Cover the banana split cake with plastic wrap or foil.
- Chill in the refrigerator for at least 2-4 hours to allow the layers to set properly.
Serving:
- After chilling, remove the cake from the fridge.
- Let it sit at room temperature for 15-20 minutes before serving for easier slicing.
- Use a sharp knife (warmed in hot water for clean cuts) to slice and serve.
Optional Garnishes:
- Add extra whipped cream or drizzle more fudge topping just before serving for an added touch of indulgence!
Notes
Did You Try Our Recipe?
There are no reviews yet. Be the first one to write one.