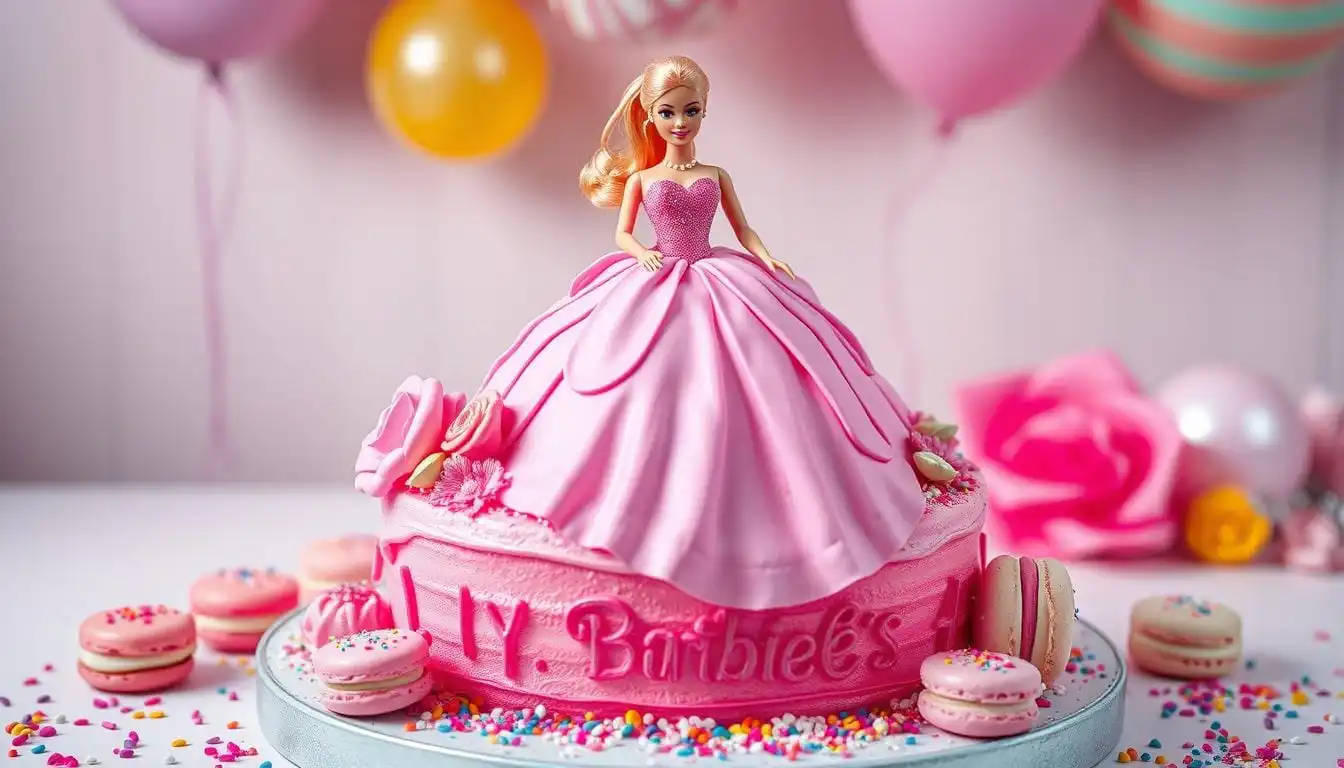
Make the best Barbie Cake recipe for Your Little Princess
Every parent knows that magical moment when your child’s eyes light up with pure joy. Creating a stunning Barbie cake can turn an ordinary birthday into an unforgettable celebration of childhood wonder.
Making a doll cake is more than just baking. It’s about creating memories that will sparkle in your little princess’s heart forever. Whether you’re planning a Barbie theme cake or exploring Disney princess designs, this guide will walk you through every delightful step of making a show-stopping dessert.
From choosing the perfect doll to mastering frosting techniques, you’ll discover how to create a cake that’s not just a dessert, but a centerpiece of celebration. Our tutorial will help you navigate the exciting world of doll cake creation with confidence and creativity.
Get ready to become the ultimate birthday cake hero – your little princess is about to be amazed!
Table of Contents
Essential Supplies and Ingredients for Your Princess Cake
Making the perfect birthday cake needs careful planning and the right tools. Whether it’s a custom cake for a special day or just for fun, start by gathering your supplies.
Your princess cake journey starts with picking the right tools and ingredients. The right tools can turn a simple cake into a magical wonder that will make any young royal happy.
Required Baking Equipment
- 8-inch round cake pans (2-3 recommended)
- Oven-safe glass mixing bowl
- Electric mixer
- Measuring cups and spoons
- Cooling rack
- Cake turntable (optional but helpful)
Cake Mix and Frosting Components
For your custom cake, you’ll need:
- 2 box cake mixes (white or vanilla recommended)
- 6-7 cups of buttercream frosting
- Food coloring (pink or purple works best)
- 1 kg cake mix bag
“The secret to a perfect princess cake is in the details and the love you put into making it.”
Decorating Tools and Accessories
- Piping bags and tips
- Offset spatula
- Barbie or princess doll
- Edible decorations
- Tylose powder for fondant
- Decorative tiara
With these supplies, you’re all set to make a stunning cake for any birthday. Remember, decorating a cake is an art that needs patience and creativity!
Step-by-Step Barbie Cake Preparation Guide
Making a perfect princess cake needs careful steps and detail. Your journey starts with knowing the basic steps. These steps turn a simple dessert into a magical centerpiece for any celebration.

Preparing the Perfect Cake Batter
Choosing the right ingredients is key for your Barbie cake. Bakers suggest using two box cake mixes for the best volume and stability. Here’s a quick guide to mixing your batter:
- Combine flour, sugar, eggs, and butter
- Mix ingredients until smooth and consistent
- Use room temperature ingredients for best results
Baking Your Princess Cake with Precision
Right baking techniques make your custom cake look and taste great. Follow these essential steps:
- Grease and flour your Dolly Varden cake pan thoroughly
- Pour batter evenly into the pan
- Bake according to package instructions
Cake Layer Assembly and Preparation
Building the iconic Barbie cake dress shape needs careful layering and trimming. Here are some professional tips:
“The secret to a stunning Barbie cake is in the layers and how you shape them.” – Professional Baker
| Cake Layer Step | Technique | Time Required |
|---|---|---|
| Cooling | Let cake rest 10 minutes after baking | 10-15 minutes |
| Removing from Pan | Carefully invert onto cooling rack | 2-3 minutes |
| Trimming | Cut layers to create full skirt shape | 5-10 minutes |
Pro tip: Freeze your cake overnight for easier decorating. Allow 2-3 hours for thawing before final decoration.
Perfect Doll Selection and Preparation Tips
Choosing the right doll is key to making a perfect Barbie doll cake. Not all dolls are good for cake designs. Your doll should be a standard 11.5-inch Barbie with a plastic body that fits easily in your cake.

- Choose a Barbie with a removable lower body
- Opt for dolls made of food-safe plastic materials
- Select dolls from collections like Barbie Fashionista or Dreamtopia
Getting your cake ready is important for safety and looks. Before putting the doll in your cake, protect it from food.
“The key to a perfect Barbie doll cake is careful doll preparation and strategic placement.” – Cake Decorating Expert
Here are the key steps to prepare:
- Wrap the doll’s lower half completely in plastic wrap
- Ensure no plastic wrap edges are exposed
- Insert the doll only after the cake has completely cooled
- Gently push the doll into the center of the cake
Pro tip: Pick a doll that fits your cake’s colors and theme. Popular colors include soft pastels like pink and purple, or bold ones like fuchsia and turquoise.
Professional Frosting Techniques for Barbie Cake
Making a perfect Barbie cake means mastering frosting techniques. These skills turn a simple dessert into a stunning custom cake. Your cake decoration skills will make the cake a memorable centerpiece for any celebration.
Professional cake decorators know that decorating a cake is all about strategy. The key to a flawless finish is in the preparation and application techniques.
Creating the Perfect Crumb Coat
The crumb coat is essential for your edible image cake. Here are the key steps:
- Chill the cake for 15-30 minutes before applying the crumb coat
- Use a thin layer of frosting to seal in cake crumbs
- Smooth the initial layer with a bench scraper
- Refrigerate for 20-30 minutes before final frosting
Decorative Frosting Patterns
Your Barbie cake needs stunning frosting designs. Try these professional techniques:
- Rosette swirls for a feminine touch
- Ruffled skirt design mimicking Barbie’s dress
- Ombre color gradient for depth
- Textured patterns using specialized combs
Color Mixing and Application
Choosing the right colors can make your cake spectacular. Professional bakers suggest:
- Blend buttercream colors for smooth transitions
- Use gel food coloring for vibrant, consistent shades
- Separate frosting into individual bowls for precise mixing
- Cover unused frosting with damp cloth to prevent drying
“The magic of cake decoration is in the details.” – Professional Baker’s Insight
With these techniques, you’ll make a stunning Barbie cake. It will delight both kids and adults.
Creative Decoration Ideas and Design Elements
Turn your princess cake into a magical masterpiece with new cake decoration techniques. These will thrill any Barbie fan. The secret to a stunning Barbie theme cake is in the design and creative details.
- Create an ombré effect with pink frosting shades
- Add pearl sprinkles for a touch of elegance
- Use edible glitter for a magical sparkle
- Make detailed fondant dress designs
Choosing the right color is key in Barbie cake decoration. A whopping 68% of customers love pink, making it the top choice for your cake.
“A beautifully decorated cake is like a work of art that tells a story.” – Professional Baker
For the best look, try these professional cake decoration tips:
| Decoration Technique | Popularity |
|---|---|
| Fondant Ruffles | 35% of designs |
| Edible Barbie Image | 55% visual appeal boost |
| Fashion-Inspired Elements | 22% of cake sales |
Your Barbie theme cake can be a memorable centerpiece. Mix textures, use different piping techniques, and add personal touches. These should reflect the birthday girl’s style.
Conclusion
Making a Barbie cake is more than baking. It’s about creating a special moment for your little princess. It takes passion, creativity, and time. From picking the right Barbie doll to decorating with fancy frosting, every step makes the cake magical.
Your Barbie cake can stay fresh for up to 3 days at room temperature or 3-7 days in the fridge. The secret is to store it right and handle it with care. The love and effort you put into it are more important than being perfect. Your cake, whether it’s princess-themed, glamorous, or superhero-inspired, will be the star of the party.
Don’t worry if it seems hard at first. With time and practice, you’ll get better at making amazing Barbie cakes. The fun of baking together is just as special as the cake. Let your creativity shine, enjoy the process, and watch your child’s face light up when they see their dream cake.
FAQ
How difficult is it to make a Barbie cake at home?
What type of cake pan works best for a Barbie cake design?
Can I use a store-bought cake mix for my Barbie cake?
How do I prevent the Barbie doll from getting dirty while inside the cake?
How far in advance can I make a Barbie cake?
What frosting works best for creating a Barbie cake design?
Can I create a Barbie cake for themes other than pink?
How do I transport a Barbie cake safely?
Make the best Barbie Cake recipe for Your Little Princess
Equipment
- 8-inch round cake pans (2-3 recommended)
- Oven-safe glass mixing bowl
- Electric mixer
- Measuring cups and spoons
- Cooling rack
- Cake turntable (optional)
- Piping bags and tips
- Offset spatula
- Barbie or princess doll
- Bench scraper
- Mixing bowls
Ingredients
For the Cake:
- 2 box cake mixes white or vanilla recommended
- 6 large eggs room temperature
- 1 cup unsalted butter melted
- 2 cups whole milk
- 1 tablespoon vanilla extract
For the Buttercream Frosting:
- 6 cups unsalted butter room temperature
- 12 cups powdered sugar
- 6-8 tablespoons heavy cream
- 2 teaspoons vanilla extract
- Gel food coloring pink or purple recommended
Decorations:
- Edible pearl sprinkles
- Fondant for additional dress details
- Edible glitter
- Decorative tiara
Instructions
Step 1: Prepare the Cake Batter
- Preheat the oven to 350°F (175°C). Grease and flour the cake pans and oven-safe bowl.
- In a large bowl, combine the cake mix, eggs, melted butter, milk, and vanilla extract.
- Beat the mixture with an electric mixer on medium speed for 2-3 minutes until smooth.
Step 2: Baking the Cake
- Pour the batter evenly into the prepared pans and the oven-safe bowl to form the dress shape.
- Bake for 35-40 minutes or until a toothpick inserted in the center comes out clean.
- Allow the cakes to cool in the pans for 10 minutes before transferring them to a cooling rack.
Step 3: Assemble the Cake Layers
- Once the cakes are completely cool, level the tops using a serrated knife to ensure even stacking.
- Stack the round cakes on top of each other and place the bowl-shaped cake on top.
- Trim the layers to create a smooth, dome-shaped dress.
Step 4: Frost the Cake
- Apply a thin crumb coat layer of buttercream frosting and refrigerate for 30 minutes.
- Apply a second, thicker layer of frosting, smoothing it with a bench scraper.
Step 5: Insert the Barbie Doll
- Wrap the lower half of the Barbie doll in plastic wrap.
- Insert the doll carefully into the center of the cake. Ensure it stands upright securely.
Step 6: Decorating the Barbie Cake
- Color the remaining buttercream frosting as desired using gel food coloring.
- Use piping bags and tips to create rosettes, ruffles, or other decorative dress patterns.
- Add pearl sprinkles, edible glitter, and fondant embellishments for a magical touch.
Step 7: Serve and Enjoy
- Carefully transfer the cake to a display stand.
- Slice and serve at your little princess’s birthday party!
Did You Try Our Recipe?
There are no reviews yet. Be the first one to write one.